Welcome to Cake decoration for dummies!
Not calling you a dummy, but really this is so easy and looks so great that by the end you’ll be very proud taking photos and sharing your creation.

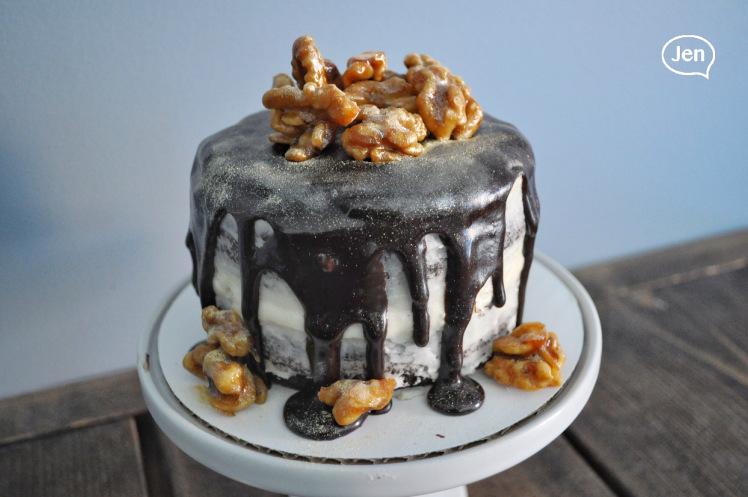
Lately I’m a little obsessed with mini cakes, so for this first example I used 2 5″ baking pans and my delicious fudge chocolate cake recipe (a shot of espresso is what makes it fudgy btw). You need to have buttercream ready and chilled, and your ganache cold as well but make sure is runny enough to drip around your cake.
For the second cake, I used only 1 7″ cake pan, same buttercream and a Ganache made with a mix of white chocolate and blue candymelts I already had from a previous little project. This blue ganache is a lot more “runny” so it spreads very easily and even and also gives the “mirror/glass” effect if is what you’re looking for.
Ganache is usually made with 1part chocolate chips (or little pieces of chocolate) and 1/2 part of very hoy heavy cream, but since I don’t really use heavy cream I make my ganache replacing that heavy cream with coconut oil (choose one without smell) and almond milk… you can use vegetable shortening instead of the oil but the result might be too runny so you might need more chocolate, it’s all trial and error when you want to make the recipe work replacing ingredients.

First you want to crumb coat your cake, this means, add icing/buttercream all around and spread evenly, this is also called dirty icing, and what it does is keep your crumbs in place, so when you chilled the cake before applying another layer or icing it will be easier and pretty (no crumbs falling apart and mixing with your decoration). But in this case we’re only doing the crumb coat step, because I want to create a “Semi-naked” cake, this means the cake doesn’t look totally naked but is not fully cover either, some people will call it just naked because is not properly iced, but here I’m sticking with the “semi” naked explanation… To be honest, is the cake effect that requires the less time and skills.

Then, when your cake has been chilled (the idea is to keep the buttercream steady), you can follow with the dripping. Take your ganache (remember, it must be cold) and go around the top border of your cake with a spoon pouring little bits of ganache leaving a space in between, pretty much you’re designing your own drips, start with just a little bit to see how tick or runny it is and if it stops or go all the way to the bottom. Once you’re happy with the result of your dripping, pour the rest of your ganache on top. If it’s thick it won’t affect the drips, but if is very runny it will join join the drips and make them bigger. Here is a very cool tutorial on how to drip drop a cake. For the topper, I made (but I, I mean my boyfriend) some maple walnuts to match the maple flavour on the cake and just keep it neat, after all, the cake was for a 6oth birthday 😛 and the final step… Add peral/gold dust, it seriously upgrades the look on any cake!

For cake #2 I did the same, but as I said, this ganache was a lot runnier so it goes all the way to the bottom and when I poured the top, it spread very fast and gave that glossy effect.


Last but no least, as I was chilling the cake, I choose a pretty paper that matched the colour on the cake and cut little triangles to make a tiny banner. Lucky me, I have a very nice selection of paper for my crafty projects, and this one happen to had a carousel in the same colours and with that vintage effect I love, so cut it too, glued it to a stick and on the cake it went! So I ended up with not just a cake with a banner as topper (I love love love doing that) but also with a vibe of old school carnival/circus/fair.